Rokeby Distance Drawing Course : Copy

How did a young woman from a rural town become an important book illustrator at the beginning of the 20th century? Join me as I chart Rachael’s artistic journey and share a drawing exercise from the course she took in the 1890s. The Rokeby Distance Drawing Course is available now on the Rokeby Museum Website.

Rowland Evens Robinson Rokeby Rachael

In this week’s lesson I invite students to make a copy of a drawing by Rachael, a portrait of her father, Rowland. Through archival material from the museum’s collection we also explore Rachael’s relationship with her father- a prominent illustrator and author.

Rowland was a major influence on Rachael’s professional career. An active author he would often get Rachael to illustrate his articles and books. Before the age of 18 Rachael had a dozen published illustrations thanks to this collaboration.

Understanding Rowland’s role in Rachael’s story, forces us to think more critically about the role of distance education in Rachael’s success. Rachael studied art with an important New York illustrator through a correspondence course. Having access to this education gave Rachael the tools to pursue her career. But seeing how hands on her father (and mother) were in her education and her early career reminds us that access doesn’t equal success. Rachael was able to take advantage of distance education because she had a stable and supportive home life.

By sharing Rachael’s story I want to pull back the curtain on the modern conception of an artist as a genius. Generally when an artist has early success it is because there is a support system around them.

I don’t think you need an author father to get your start as an illustrator. But I think it suggests that beyond education, artists need to think about finding some kind of apprenticeship to learn the business side of their trade.

Click here to read the full lesson!

Bill Reid: Art & Memory

Bill Reid Inspiration Art craft

Bill Reid was my first engagement with art. I can still remember seeing his Raven and the First Men sculpture and the sense of awe that I felt. The launch of the new toonie with his design brought me back to those memories.

It’s interesting to think about Reid’s work and my own practice all these years later. What stands out to me now when I look at his work is the quality of his craft and the narrative clarity.

Looking at a Reid sculpture, I have the same “how did a person make that” response that I did all those years ago. His work is beautiful. The composition, the detail and his carving technique are all incredible.

As a kid I remember getting pulled into the story of Raven. In a single still image we understand the story that Reid is trying to communicate.

As an artist I strive for these same artistic qualities. I want my art to be beautiful and I want it to communicate clearly.

Bill Reid Toonie

Reid might not seem like an obvious influence on my work. We are working in different cultural traditions. For me what connects our work is craft. Reid apparently rejected the title of artist and called himself a ‘maker of things’. I get that. Like him it’s this process of making that drives and defines my practice.

My knowledge of craft acts as an entry point for me to engage with different fine art traditions. When I look at something like sculpture (which I don’t do myself). I look for clues to how the artist made the object. When I start to understand their process the intention of the artist starts to reveal itself organically. There is always a connection between how something is made and what it is trying to communicate.

Drawing Challenge: Building Blocks

Remember being a kid playing with building blocks? Remember that rush you got when you realised you could stack and build out your blocks? We can do the same thing on our sheet of paper. The same way this kind of play teaches kids valuable cognitive skills, we can use this exercise to develop our drawing skills.

This week’s challenge

For this week’s challenge we are going to expand on last week’s challenge and start to build in 3D space. I recommend that you work through last week’s lesson before you start the one from this week.

For this week’s challenge you will need two coloured pens and a slightly thicker marker. I would recommend a blue and a red ballpoint pen and a sharpie marker.

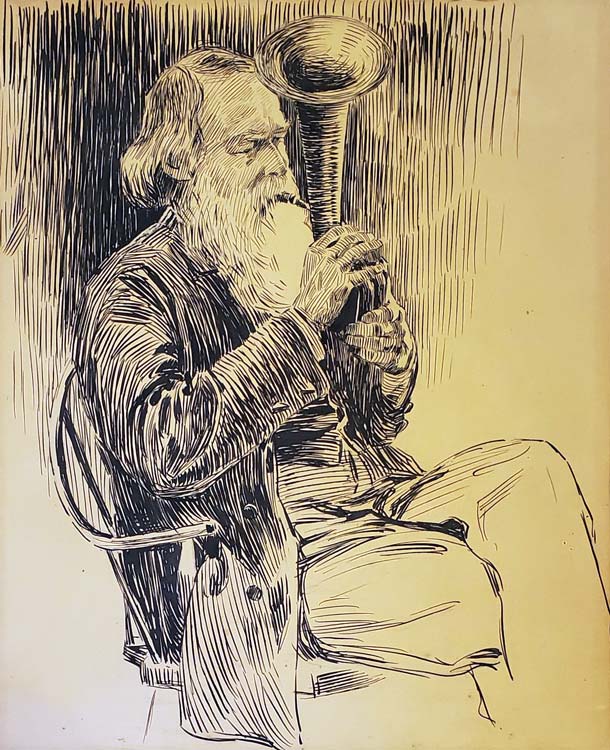
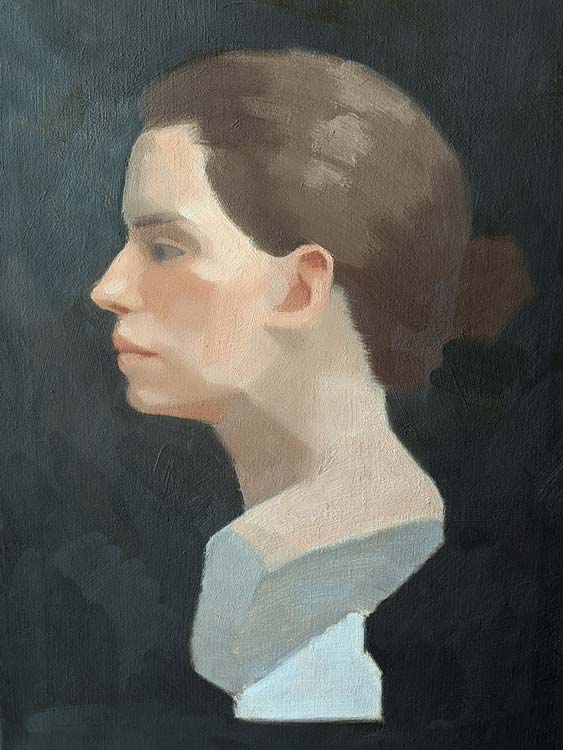
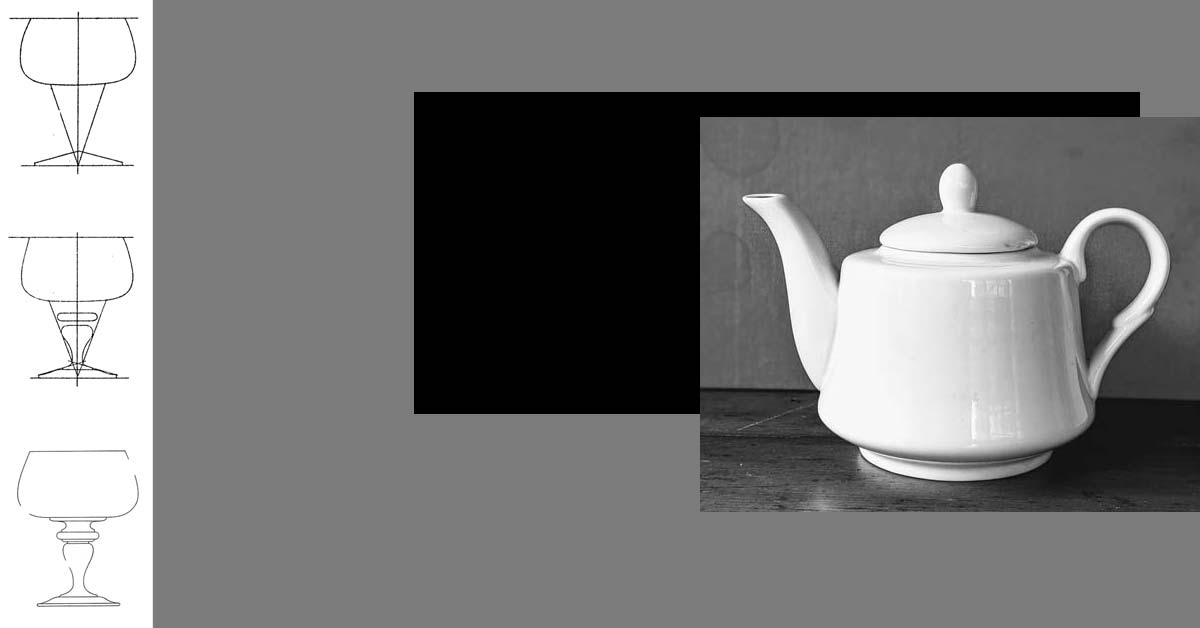
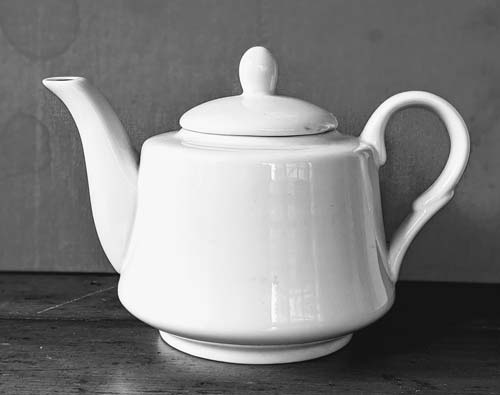
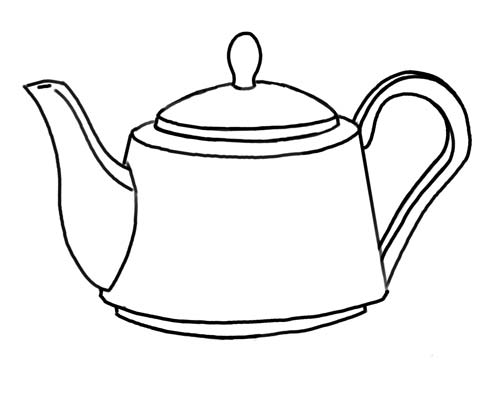
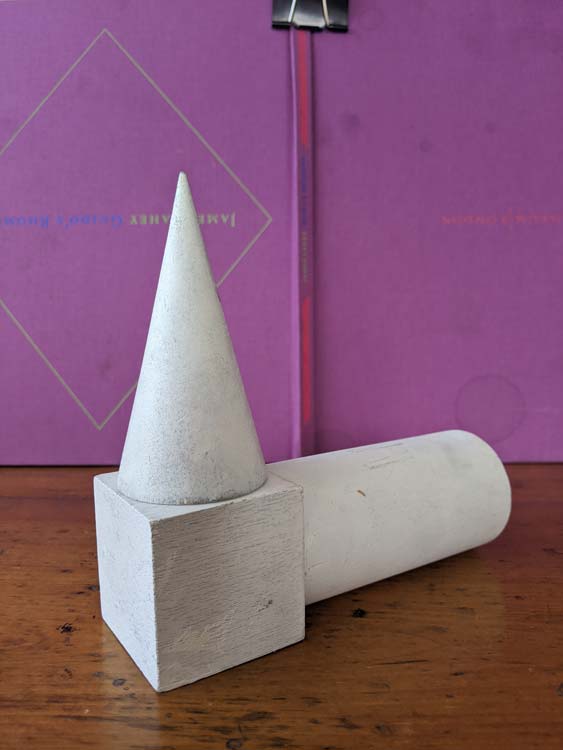
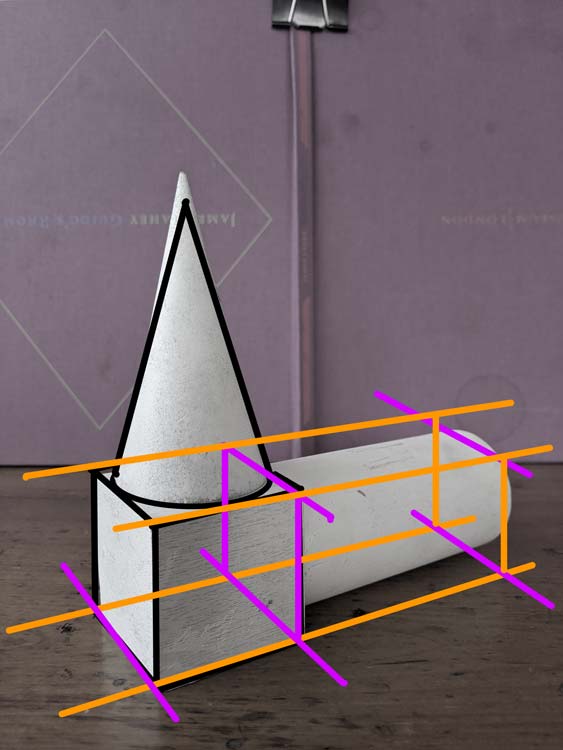
We are going to use a couple photos as reference for this week’s lesson. You will find the photos below.

Start with cube

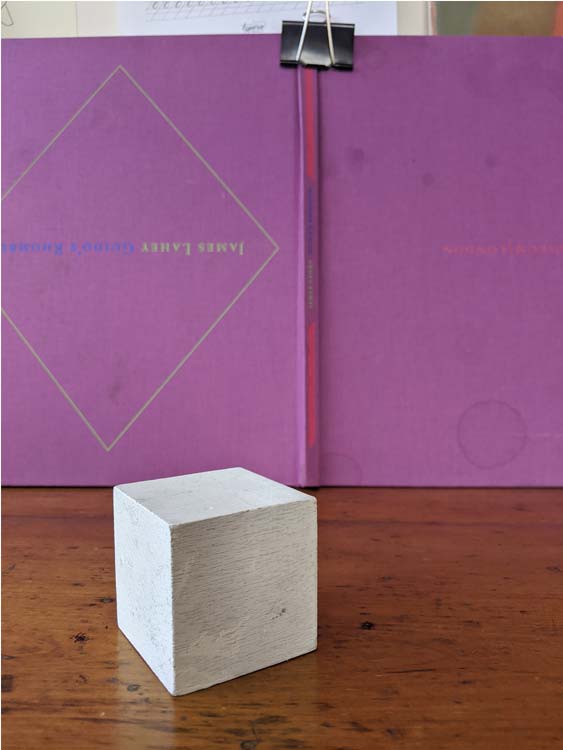
In two point perspective the only parallel lines are the vertical height lines. The width and length lines of our cubes will recede towards two vanishing points (Vp1, Vp2).

Our first step is to draw a horizon line. When we look at the cube we can see a lot of its top side. This tells us that the horizon line is significantly above our cube.

Step 2: vanishing points

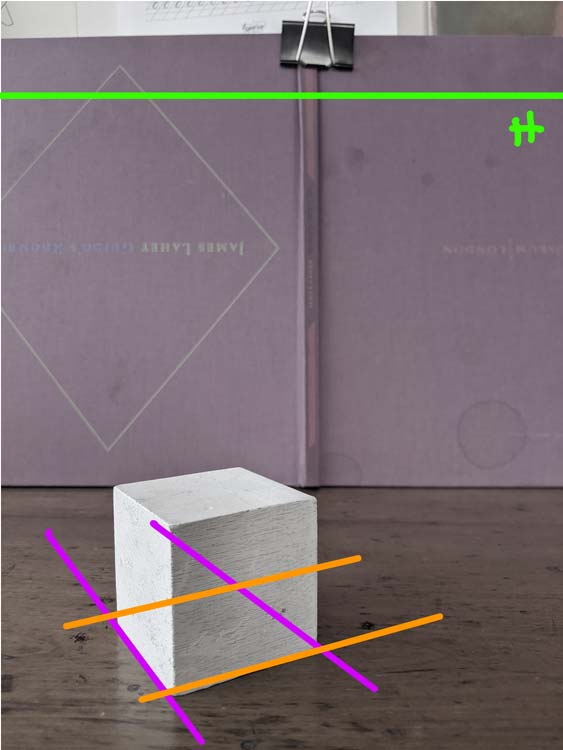
To find our two vanishing points we are going to take the angle of the front two bottom edges of our cube. Line a pencil up against the bottom right edge. Now imagine that your pen extended all the way until it met the horizon line. Where would that point be?

Do the same thing with the bottom left edge.

In both cases that point where the line extending from the bottom line and the horizon line meet is outside our picture plane (the rectangle that defines our drawing).

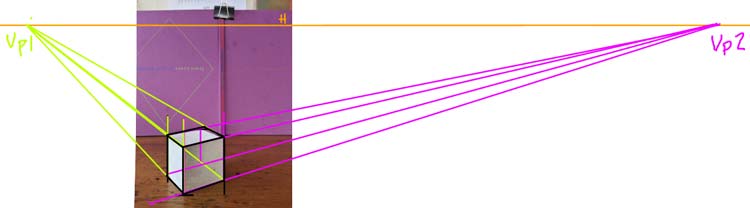
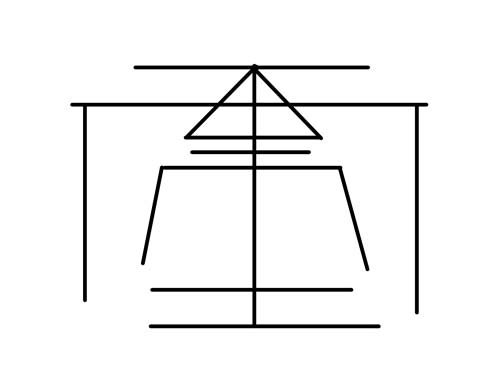
Above is an image that shows our two vanishing points. Look how far vanishing point two is. This is a pretty typical case. It’s very rare that your vanishing points will be close to your picture plane. So we have to get used to imagining where they are and making construction lines that suggest or estimate that point. Our aim is not exactness, our goal is to make images that feel like they are in perspective.

One thing that can help is to draw a thumbnail in the corner of your page that shows the relationship between the vanishing points and the picture plane. In our case it’s important to note that the vanishing point on the left is much closer to the picture plane than the right vanishing point.

Step 2: Base

To start, let’s draw a square in two point perspective.

Mark a point near the bottom left of your page. This will represent the front corner of our square.

Let’s start from the right side. The length lines that define the right side will all originate from the right vanishing point (Vp2). We know that this point is a long ways away. This tells us something about the slope of the line. Because it will take longer to reach the vanishing point we know that the slope of this line will be less steep. Measure the bottom right edge of the cube in the photo to get the exact slope.

Repeat the same process on the left side. The length lines that define the left side will be much steeper. We know the vanishing point on the left is much closer to the picture plane. To ensure that the left length lines meet the horizon more quickly we need a line that is closer to a vertical.

Now let’s indicate the invisible lines that define the back edges of our square. We can’t see these lines because our cube is opaque. We are going to use the information we have to estimate these lines.

Let’s start with the back left line. This line is opposite to the right front line. In theory these two lines are parallel. In perspective any lines that are parallel will converge towards a shared vanishing point. So the left back line will recede towards the right vanishing point. We want to draw a line that is very similar to our front right edge. But it should slope slightly towards that first line.

For the right back line, the same principles apply. In this case, the back right line is moving towards the left vanishing point. It will look very similar to the left front edge but again it should slope slightly towards the front line.

Getting the base correct will make all the difference as you move through the drawing. So spend all the time you need to get it right.

Step 3: Build out your cube

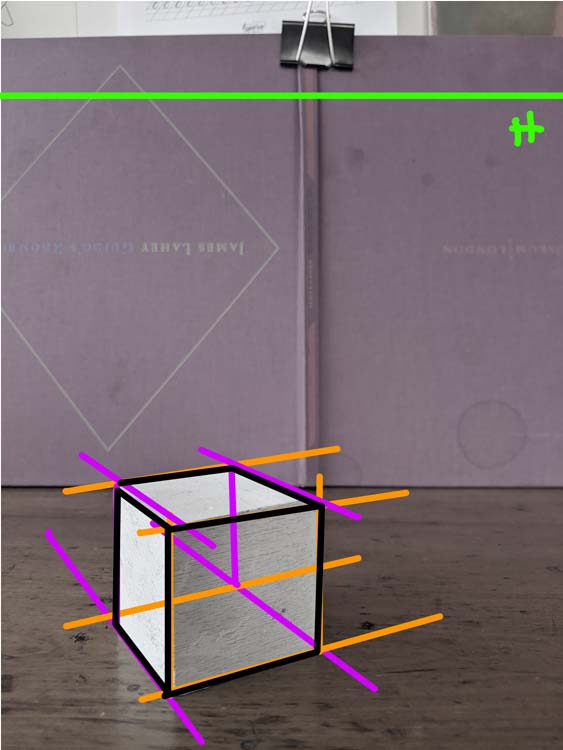
Build out the rest of your cube starting with the two front sides and then the top of your cube. Think like a builder and work from bottom to top. As you make new lines, think about their relationship to the vanishing points.

To get a step by step guide to building your cube check out last week’s blog.

Add a Cone

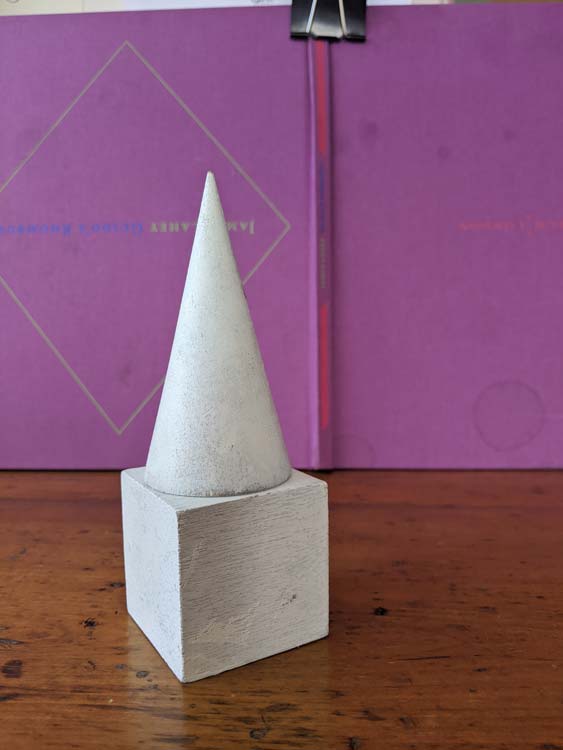
Ok now that we have a base cube, let’s have some fun! Let’s add a cone to our drawing!

We don’t know how to build a cone yet. But we do know how to build a cube or a box. So let’s start with what we know.

Step 1: Draw a box

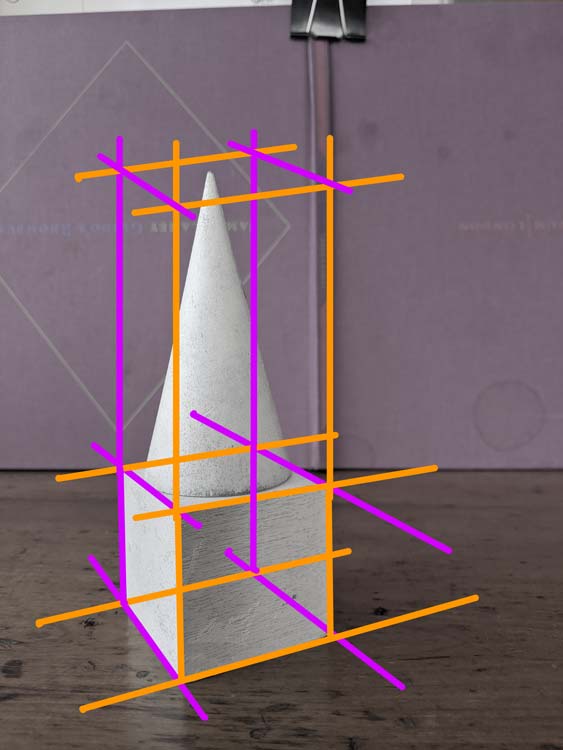
If we measure our cone we can see that it’s approximately two cubes high. So let’s build a box measuring two cubes on top of our original cube.

To build this next cube we need a base. Well lucky us we already have our base. The top of our original cube is also the base of our cone.

To build side walls around our base we stretch out our four vertical lines. Go ahead and stretch them just past your top measurement.

For the top plane we need to use our imagined vanishing points. The front left edge and the back right edge will both move towards our left vanishing point. Our right front edge and our back left edge will move towards our right vanishing point.

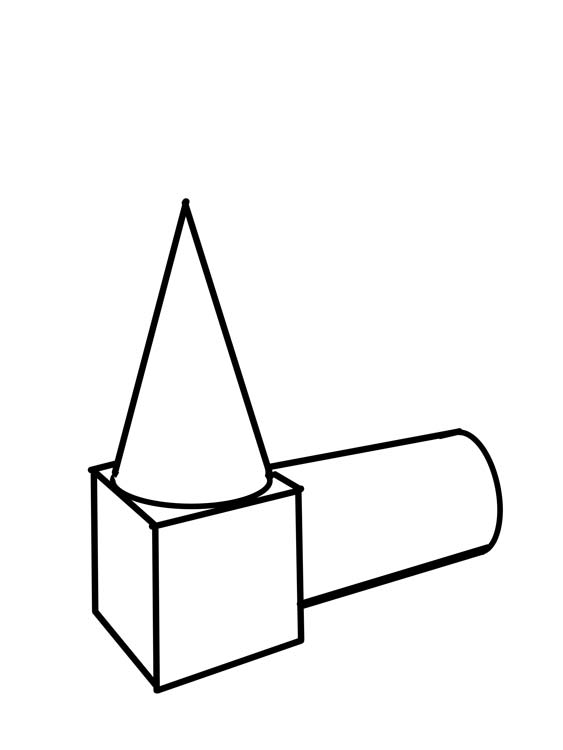
Look at how the cone sits inside our cube.

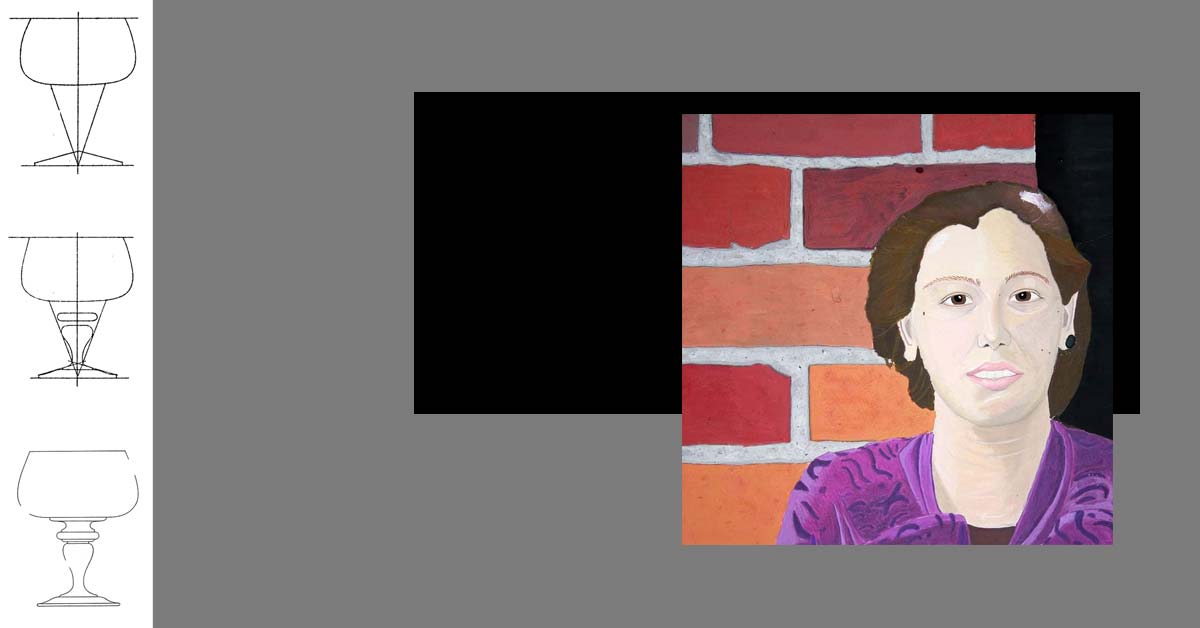
Step 2: Ellipse base

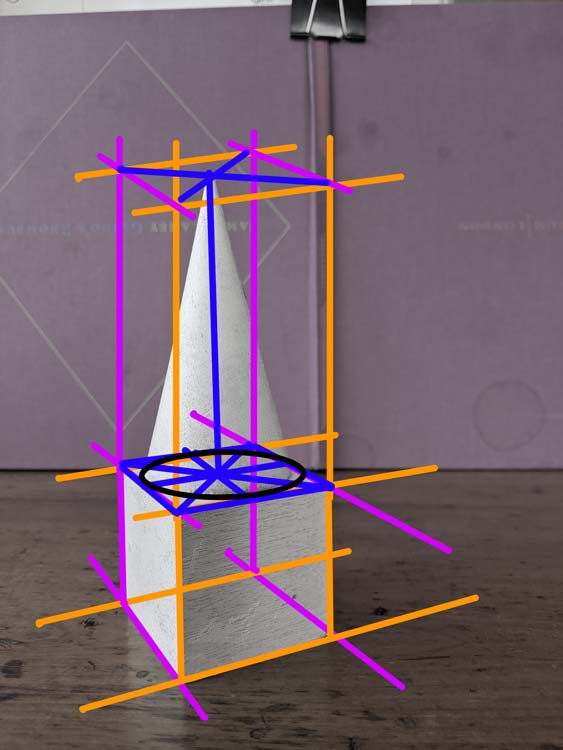
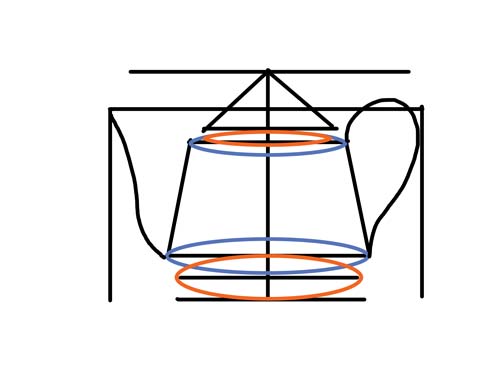
Now let’s think about what makes our cone different from our cube. Let’s start with our base (we always start at the bottom). The base of our cone is defined by a circle in perspective (we call this an ellipse).

To draw that ellipse we first find the centre point of our base square. Draw an X starting at the four corners of the square. The point where the two diagonal lines meet is the centre of your square. Knowing where the centre is we can draw two more lines that run through the centre of this square. These should make a kind of cross in perspective.

When we draw a circle in a cube we see that the circle hits the square at these centre points of the length lines. These points mark the four crests of the circle’s curved line. We can use this information to help guide us as we draw our ellipse to represent the base of our cone.

Step 4: Top

The top of the cone is quite unlike its base. The top is not flat or round, it is defined by a point. But how do we decide where that point is? Rationally, we know that the point is above the centre point of our base. If we draw a vertical line starting from the centre of our base up towards the top of our new box, we can find our point. This line represents the centre line of our cone.

To complete our cube draw two diagonal lines. First, from the centre of the right front edge of the cone base to the top point. Next from the middle of the left back edge to the top point of the cone.

Add Cylinder

In the same way that we built on top of our cube, we can also build out from our cube. Let’s add a cylinder to the back left side of our cube.

In the same way we build a cone inside a box, we can build our cylinder inside a box that comes off our original cube.

Step 1: Base

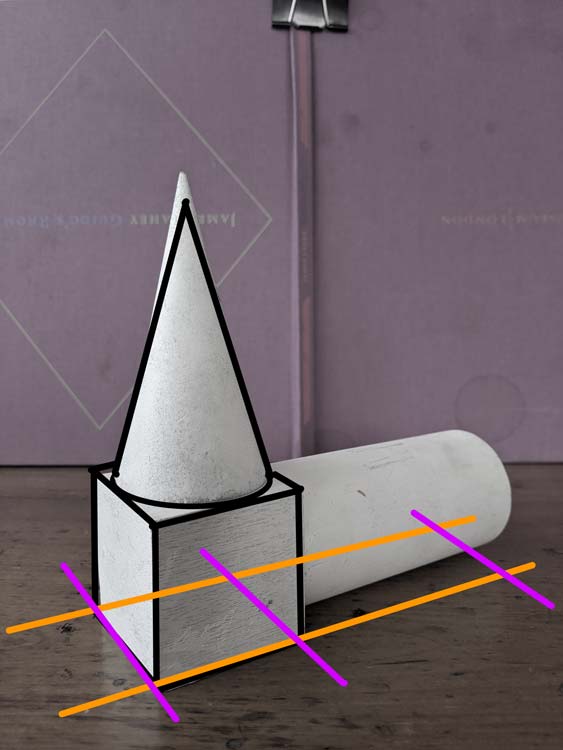
To start building this new box, we start with our base. Always start with the base. It’s boring but it makes drawing so much easier!

This part is really fun, because we get to be really lazy. In the same way that we extended our cube’s vertical lines to build the walls of our cone’s box, we can extend the length lines of our cube’s base to make our new base!! Magic.

Step 2: Build out a box

Let’s start with the front right edge. Our new box measures about the same as the total length of our cube (both sides). So let’s pull the front right edge of our cube about that length to the right. Now we can extend the back left edge the same distance to the right. Mark a point on the front right edge that represents the right front corner of our new box. Starting from this point, we can extend a line towards our left vanishing point. This line will represent our back right edge. Now we have the base of our cube.

Using the construction lines from the top of our original cube. We can build out the rest of this new box.

Step 2: Cylinder in box

To build our cylinder we are going to start with the two sides that are defined by an ellipse. We are going to divide the squares that hold these ellipses in the same way we did for the cone.

To draw that ellipse we first find the centre point of our squares. Draw an X starting at the four corners of the square. The point where the two diagonal lines meet is the centre of your square. Knowing where the centre is we can draw two more lines that run through the centre of this square. These should make a kind of cross in perspective.

When we draw a circle in a cube we see that the circle hits the square at these centre points of the length lines. These points mark the four crests of the circle’s curved line. We can use this information to help guide us as we draw our ellipses that make the two sides of our cylinder.

Now all we need to do is define the top and bottom edge of our cylinder. The lines for the top edge should be just left of the vertical centre line of the side squares. We want it to feel like the line is extending from the ellipse. Or that the ellipse is turning into this top edge. Same principal for the bottom edge. The line should start somewhere on the right side of that centre vertical line of the side squares.

Finishing up the drawing

To give our drawing a clean feel. We can go over our main lines with a darker or thicker pen. We don’t want to draw all of our construction lines. Only lines that define the edges that we can see. Take your time on this step and try and clean up any loose lines and improve your curves.

In Dialogue with a Curator

I’m blown away by the different online initiatives that are being offered by local arts organizations to keep serving our community!

Durham Art Gallery Initiative

Yesterday I took part in a Virtual Studio Visit with the curator Jaclyn Quaresma of the Durham Art Gallery. The initiative gives emerging artists the opportunity to dialogue with curatorial professionals to discuss recent projects! What an opportunity!!!

It was incredible to talk through my current #DrawingChallenge project with Quaresma. She was incredibly generous with her time and gave me some great feedback. .

Pitching my project

pitching my project courtney clinton

We discussed my engagement with a 19th century drawing course (part of the Rokeby Museum archive) and the different ways that I can activate this material for a contemporary audience.

As I described the project, I talked a lot about issues of accessibility for rural artists. I was thinking about the story of Rachael Elmer who took this course while living in rural Vermont in the 1890s.

The Durham Art Gallery’s mission is to bring art to a rural region in Ontario. Discussing my ideas with Quaresma, I realised that I don’t really have an authentic connection to the issues that face rural artists.

Developing my idea

My connection to Elmer’s story is not the specifics of being a rural artist but our shared experience of learning to draw. As we learned our craft both were in situations of isolation and art became our community.

As a realist I often feel outside the main cultural community of Montreal. My own experience with correspondence education was about finding community with other students, teachers and the art.

So the guiding idea of this project is this relationship between knowledge and connectivity (and what that can mean in times of isolation). When I discovered Rachael’s story, I felt an instant kinship. Despite time and place she became a friend. What allows for this seemingly impossible friendship is our shared visual language.

Selfie: #Neutral

This painting is called #neutral. The aim was to address a conceptual limitation in the series of Selfie paintings I have been making.

Context

#Study (WIP), Selfie, 2020, graphite on paper

In this painting I portray myself like a marble sculpture. So much of the tradition of realist art references Roman and Greek sculpture. This kind of sculpture is what we call ideal art. It presents an essential idea of the human form. It’s not meant to represent a specific person but an idea of the average person. When artists want to express a universal message they will use this kind of “generalized” figure to say this is everyone’s story. For a long time these generalised figures have been presented as white. In both fine art and pop culture we’ve treated white culture as neutral or most relatable.

There is a lot of great art right now that is challenging this idea. I think of Kent Monkman or Kehinde Wiley who make ideal art not only with different bodies but also with a different intended audience.

Acknowledging bias

With my own Selfie series, I’m asking my viewers to look beyond the subject (me) and think about the history and process of image making. I’m asking them not to think about me as an individual. In this way I’m treating myself as a neutral subject. .

To paint this I used both a neutral and a red paint. By expressing the color of my skin, I want to acknowledge that there is no such thing as a neutral figure. We all have an identity and that informs our understanding of the world. It’s scary to admit our own shortsightedness. But I think in our divisive culture, it’s the only way forward.

Drawing Challenge: Teapot from Life

We are back! This week we are doing another drawing from life challenge! Working from life is where we really test our ability to analyse visual information.

We are doing a very similar drawing to last week’s exercise but don’t be discouraged if this feels a lot more challenging. When we copy a photo or another drawing the information has already been flattened. When we work from life we have to translate 3D space into a 2D pictorial language.

So why bother? Why not just work from photos or drawings? Working form life teaches the artist to think about the form of an object. Learning to decode the structure of objects teaches us not only how to copy but also how to construct reality. For any artists looking to create imaginary images, characters and worlds this ability to draw constructively is essential.

This week’s challenge

For this week’s challenge you will need to find a teapot. Don’t worry too much if your teapot looks different to mine.

My aim is to teach you a process not to teach you how to draw my teapot. Read through the instructions below and use them as a guide for drawing your teapot. Don’t copy exactly my lines and shapes.

If you are feeling really intimidated, do two drawings. First do a drawing from my photo of a teapot and use my sketches as your guide.

Now do your own drawing from your teapot and try and recreate the three steps that I demonstrate but using the shapes that define your teapot!

How to start the drawing

To start our drawing we are going to block-in the teapot by reducing its parts to basic flat shapes. Start by blocking in the general height and width of the teapot with 4 lines. For now the two verticals lines will represent the furthest edge of the handle and the spout. Next draw a vertical centre line.

The body of our teapot looks like the bottom half of a triangle. The two sides slope inward. We can imagine that these two lines would eventually meet at a point. Already we understand what is being represented. The lid of our teapot can be represented with a triangle. We don’t need to show any of the detail – we just want to show the overall space that the lid will take up.

Even though we have only used a couple lines and flat shapes we can already imagine our teapot.

Top and bottom side

To give our teapot a sense of structure – to translate it from a 2D to a 3D drawing we need to indicate the base and the top side. Take your time and compare the length of your top side to the length of the body of your teapot. A common mistake is to make that top side too narrow. Sp measure twice.

For my teapot the top and bottom side are a circle shape. Because we are seeing these shapes in perspective we don’t see a circle we see an ellipse or a squashed circle.

Even though we can’t see the whole ellipse it’s important to indicate even the back side that is invisible to our eye. Again our goal with this drawing isn’t just to represent what we see but to understand the structure of our teapot.

To help us draw our ellipse we first draw a centre line and mark off the length and width of our ellipse. With all of this information we can now draw our ellipse. My teapot has four ellipses. One for the top and bottom side of my teapots body (blue). One for the base of my lid (orange). And one for the bottom side of my teapot base.

Finally, let’s indicate the outer edge of the teapots spout and the handle.

How to clean up your lines

Now you have enough information to add the details that make the drawing interesting and dynamic. Take your time adding these last shapes.

When you are satisfied with your drawing, you can take a darker or thicker pen to draw over your lines. Make sure to take your time on this final step. Keep looking at your teapot. It’s easy to fall into automatic mode here and lose some of the subtlety of your lines.

Ode to Collaboration

I’m in the middle of an intense period for application writing and I’ve been thinking a lot about all of the invisible labour that goes into an arts career. Being an artist is a lot like being an entrepreneur. Not only do you make the work, you also have to get it out to a public.

The later half can take up a lot of time. If you look at the careers of so many great artists they all had support from a collaborator (usually their wife).

My collaborator

In my own practice I’m equally indebted to a handful of people who have quietly offered their expertise and helped me in so many ways over the years. I wanted to pay homage to a key collaborator, my sister, Lou Laurence. The image is a painting I did of her years ago. It’s based on a photo from a rainy summer month we sat on our front porch conspiring to become creators.

For half a decade she has acted as my editor and chief collaborator. Not only has she helped me correct countless applications and artist statements, she has been the person I go to when I need feedback on a new idea. A musician and a total brain, she has helped me refine and articulate my work and my artistic vision. To have this kind of collaboration has been central to my development as an artist.

Value of Collaboration

Because of the familial nature of these partnerships this work gets overlooked. It doesn’t show up on our tax statement and so it doesn’t exist. It’s a problem because it means we have a false understanding of what it means to make creative work.

Making visible my own community aims to challenge the stereotype of the independent artistic that gets discovered thanks to some divine force. It’s a reminder that we all depend on collaboration and community.

Failure: My Adventure in Italy

An Ode to Failure!

I came across an old postcard I sent to my mom right after University when I was living in Italy.

Peggy Guggenheim Portrait
Peggy Guggenheim, photographed by Man Ray, Paris 1925

I like to joke that I spent my 20s living like an artist and now, that I’m actually an artist, I live like a mild mannered accountant. I save all my wild energy for the studio.

Ticket to Italy

So after graduation and a year working in a restaurant, I concocted a crazy plan with a good friend to move to Italy. It all started with a shared dream to intern at the Peggy Guggenheim Collection. I spent at least a month putting together the perfect application. I poured my heart and soul into it….and I didn’t get it.

I kept applying for different jobs from Canada as I saved up for the trip. I felt like I needed a job to be able to really commit to this adventure. For 6 months I got nothing but rejections. Finally we decided we would go even without jobs. I had enough savings to get me through the first couple months and the courage (ignorance?) you can only have at 22. So we applied for our visas and booked our tickets.

Learning to Fail

The day of my flight I got an email inviting me to interview for a position with a small newspaper in Milan. They needed an English speaker to write for a European focused blog they ran. Somehow I got that job and spent about a year as blogger in Milan. Writing wasn’t my calling. I have a mild learning disability so I make what looks like a lot of typos when I write. Not great when you have lots of tight deadlines. I tried to pursue journalism for a while but eventually moved on.

Now I’m doing something I love even more! And that the experience as a blogger gave me enough confidence in my writing that I’ve made blogging part of my art practice. At the time not getting the Guggenheim internship and not becoming a journalist felt like a real failure. Now it all feels fortuitous.

Monkman’s Challenge to “Western” Art

Just listened to a great interview with the artist Kent Monkman on the Art Newspaper Podcast! One thing that has always impressed me about the artist is his ability to clearly articulate his practice. This is someone with a very clear vision of both what he wants to say and how he wants to say it.

Critique of Painting Tradition

In the interview, Monkman explains his relationship with the Western painting tradition. In his early figurative work the medium was the message. His aim was to mimic the historic American landscape tradition as a way to critic that tradition and it’s portrayal (or lack there of) of Indigenous culture.

Kent Monkman trappers of men painting
Trappers of men, Acrylic on Canvas, 2006

Giving Voice to New Stories

In the interview Monkman discusses how his relationship to the medium evolved as he discovered old master artists form other nations (he mentions visiting Prado Museum). Overtime realism became less the target and instead a kind of tool to tell new stories that had not been given voice.

the madhouse kent monkman
The Madhouse, Acrylic on Canvas, 2019

His use of the painting tradition challenges the idea that painting is an expression of Western culture. The artists ability to use the medium to tell the history of his community shows how malleable the medium can be. In trying to understand the nature of art, we have to consider the difference between culture and knowledge. The images we create through painting make up culture. The process we use to make those images is a kind of knowledge.

Using Technology to Sell Art

The Artist Nicolas Uribe

One of my favorite contemporary painters right now is Nicolas Uribe.

For me he’s a great example of an artist who really pushes the limits of colour and caricature but maintains a really solid sense of drawing and structure. His work feels like a continuation of the tradition built up by artists like Rembrandt Harmenszoon van Rijn, John Singer Sargent and Norman Rockwell.

nicolas uribe instagram painted life

Making Art for Instagram

Beyond aesthetic, I also find him interesting because of the business model he is developing. We hear a lot about the art market struggles, yet this is an example of a small actor who is developing a new economic model.

With a substantial instagram following Uribe has started making work that is meant almost exclusively for the small screen. Over the past couple of years he developed a series of small scale sketchbook paintings called Our Painted Lives : A Sketchbook-Life Experience. Throughout the process he shared the images to his instagram.

Nicolas Uribe sketchbook painting

When asked by James Gurney about the experience of creating art for instagram Uribe said, ” it’s a very direct channel for visual communication. In theory there are many other live channels, like youtube, twitch, or facebook, but the artist community is very active in Instagram. I also find that the default ephemeral quality of the live videos (they’re only up for 24 hrs), emphasizes the fact that you feel you have to be there when something is being painted. That same presence, that same sense of urgency is the one I feel when I have to execute a painting in two or three, one hour sessions.”

Instead of courting a gallery show, Uribe set up an Indiegogo campaign to have the series printed as a book. Followers were invited to support the campaign by per-ordering a book. For a higher fee you could also get an original drawing or a painting.

New Online Economy

I purchased a book and I am very excited to hear that they are now being shipped. In the email announcing the shipment Uribe unveiled he is starting a new online video education program.

Again all the content will be shared for free online and there will be a way for fans to financially support the project – if they want.

For me it’s a really interesting example of this new ‘pay what you can’ economy that is developing online. It’s exciting because the model makes culture more accessible – anyone can see his work online. But it’s also exciting because it seems to be viable. For his indiegogo campaing the artist raised 300% of his intended target.

For anyone trying to figure out how technology will impact the art market this is an artist to watch.