We are back! A central theme for the drawing challenge is control. With every exercise, I ask you guys to work with intention. Our aim is to think about every line that we put down on the page.
So why am I such a control freak? Isn’t art about self expression and creativity!
Absolutely, but there are different ways to achieve that creative freedom. We can achieve freedom by blowing up the system and taking a no rules approach. There is some amazing art that has come from this kind of approach.
But we can also achieve creative freedom by mastering the language of drawing. Great poems and plays are created by writers who have a mastery over written language. They know how to use vocabulary and grammar to create and bring to life imaginary scenes and characters.
Beyond the fine arts, architects, fashion designers and industrial designers all use drawing to create something brand new. For me this is the ultimate power of realist art: the ability to create new recognizable worlds.
This week’s challenge
For this week’s challenge we are going to start to think about how we can change and manipulate our subject. We are going to start off simple but this first step on a journey to learn how to draw from imagination.
For this week’s challenge you will need two coloured pens and a slightly thicker marker. I would recommend a blue and a red ballpoint pen and a sharpie marker.
For an object, we are going to use the cube. From a cube we can draw almost any object in perspective. Our challenge is to rotate a cube from a front facing position to a two sided position.
How to draw a front facing cube
A front facing cube is also known as a cube in 1 point perspective. We see two sides of the cube. The front side and the top side. The front side is defined by two horizontal lines and two vertical lines. These lines are parallel to the edges of our page. The top side is defined by two sets of lines. The horizontal lines that define the top and bottom edge are parallel to the horizontal lines of our front side. What gives the cube a sense of space, are the two length lines recede towards a central point on the horizon line.
Step 1: Horizon line
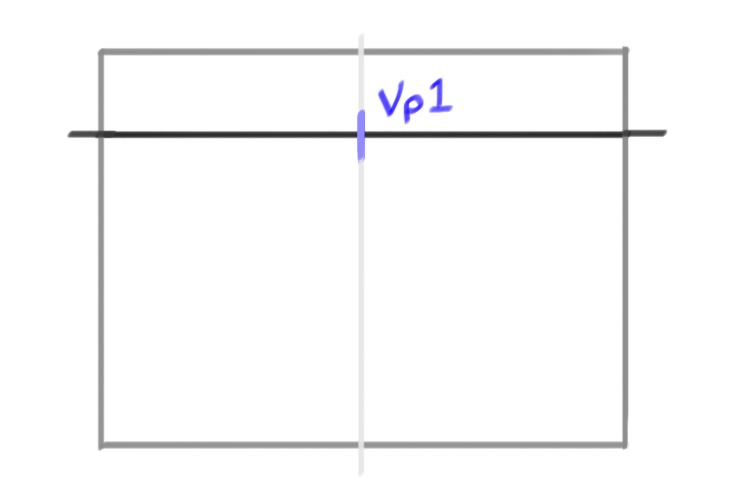
Draw a large box (6 x 8 inches) that will represent our page. Near the top of the box draw a horizontal line. This line will represent our horizon line. The horizon line represents the eye level of the artist.
Next mark a vertical line down the centre of the box. In a new colour mark a small line where the horizon line and the vertical centre line intersect. This will be our vanishing point (Vp1).
Step 2: Base
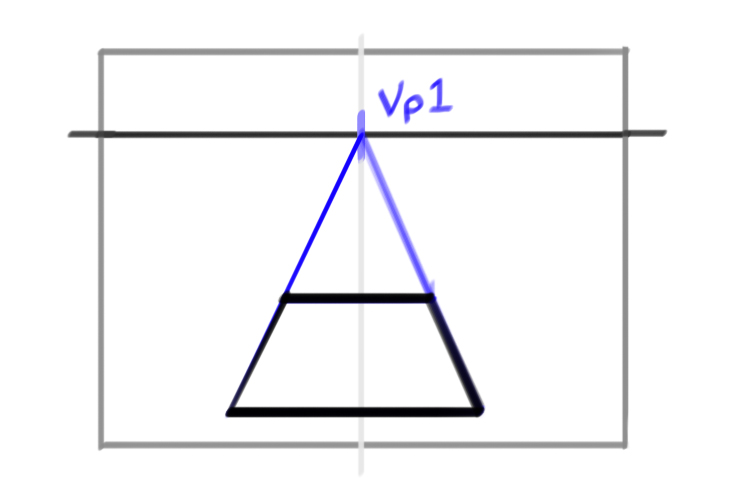
First step is to draw a square in one point perspective. This square will act as the base for our cube.
When we draw an object in perspective we always start from the bottom and build up our object. We can think of ourselves like construction workers – you would never start with the roof.
Near the bottom of the page mark two horizontal lines. These will represent the front and back edge of our square. To find the length lines of our square we draw two lines that start from the corners of our front edge and recede towards our vanishing point.
Step 3: Front side

Now let’s indicate the front side. Start by drawing two vertical lines that represent the two side edges of our cube. Indicate the height of the front side by drawing a horizontal line joining the two top corners of the two vertical lines.
Step 4: Top side
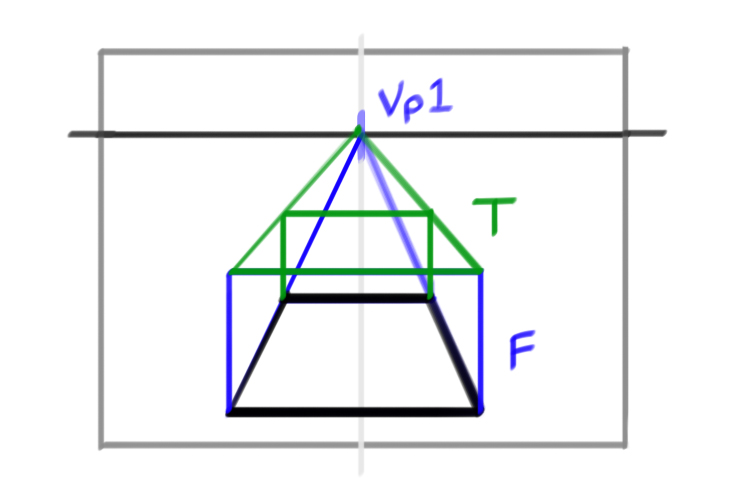
Still thinking like a builder, before we build that top side we need to first build the back wall of our cube. At the back edge of our base square, draw two vertical lines . Don’t worry too much about their height. Just make them high enough that they could support our top side.
To determine their true height we are going to pull two diagonal lines. The lines start at the vanishing point and come all the way to the two corners of the top horizontal of our front side. On their way from the vanishing point to those front corners, the lines will cross through our back vertical lines. This point of intersection marks the top of our back side.
Draw a horizontal line joining the two back vertical lines.
To really indicate your cube draw over the main lines using a thicker marker.
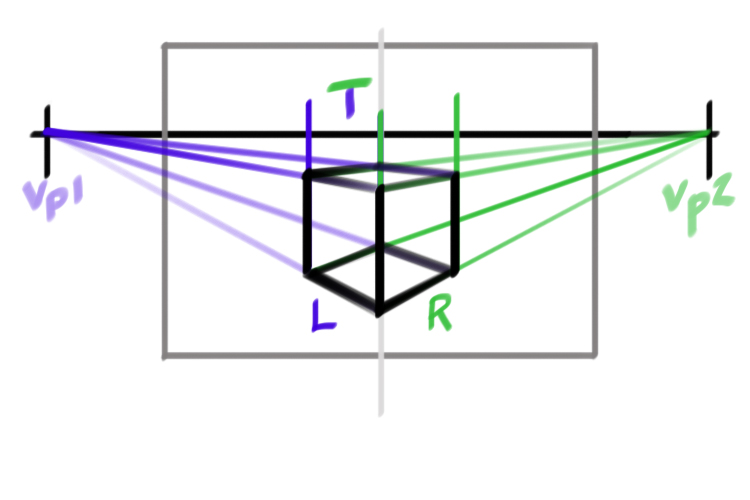
Rotating the cube to see two sides
Ok now we are going to rotate our cube. Right now we can see two sides: a front and a top. To make a more dynamic image we are going to rotate this cube so that we can see three sides: top and a left and right side.
In two point perspective the only parallel lines are the vertical height lines. The width and length lines of our cubes will recede towards two vanishing points (Vp1, Vp2).
Step 1: Horizon line
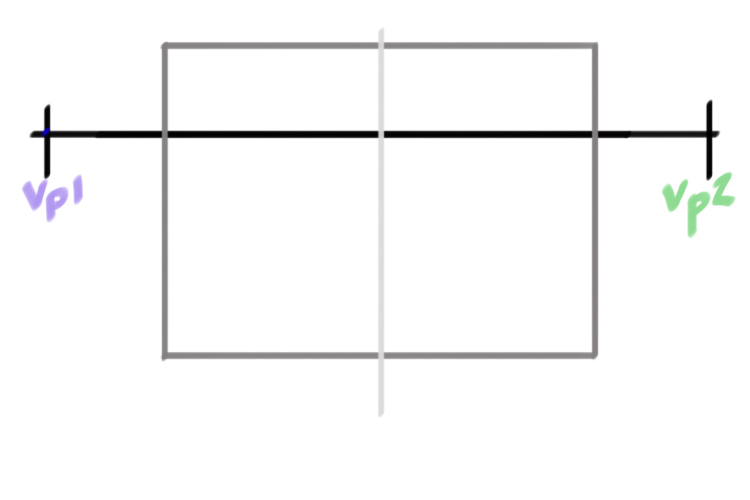
Draw a large box (6 x 8 inches) that will represent our page. Near the top of the box draw a horizontal line. This line will represent our horizon line.
Next mark a vertical line down the centre of the box.
Mark two points on the outer edges of your horizon line (Vp1, Vp2), make sure that these points are outside of your main box. These two points will represent our two vanishing points.
To draw an object properly in two point perspective, it’s important to keep the vanishing points outside of our drawing page. If the vanishing points get too close the object starts to look warped.
NOTE: with one point the vanishing point is on the centre line of the page. For two points the vanishing points are outside of the picture.
Step 2: Base (two vanishing points)
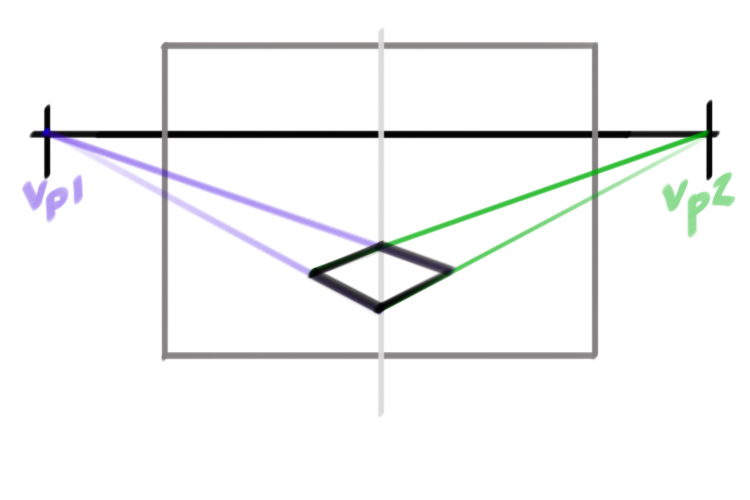
Just like Drake, we will always start from the bottom and build our way to the top. ;D
So let’s draw a square in two point perspective.
Mark two points near the bottom of your box on the vertical central line. These two points will represent the front and back corner of our square.
Let’s start from the left side. The length lines that define the left side will all originate from the left vanishing point (Vp1). Draw two diagonal lines starting from the left vanishing point (Vp1) and ending at the two points representing the front and back corner of our square.
Repeat the same process on the right side. The length lines that define the right side will all originate from the right vanishing point (Vp2). Draw two diagonal lines starting from the right vanishing (Vp2) point and ending at the two points representing the front and back corner of our square.
The lines from the left and right vanishings points will cross at four points. These four points represent the four corners of our square. Use a thicker marker to trace over the lines of our base square.
Step 3: Left side
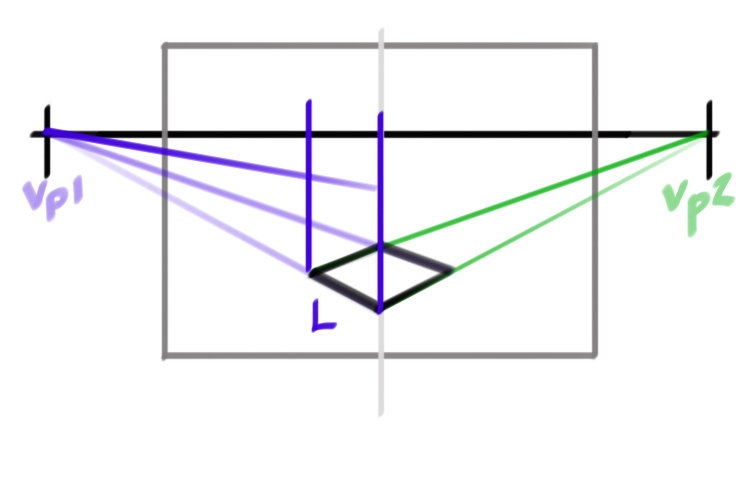
Now let’s build our first side wall. Let’s start with the left side.
First draw two vertical lines representing the squares centre edge and the left edge of our cube. Again, don’t worry too much about the height. Better to make them too long than too short.
To determine the height of our cube mark a point on the centre edge (which is also the vertical centre line of our box). To find the top edge of this left side, draw a line from the left vanishing point (vp1) to the point you just marked on the centre edge.
Step 4: Right Side
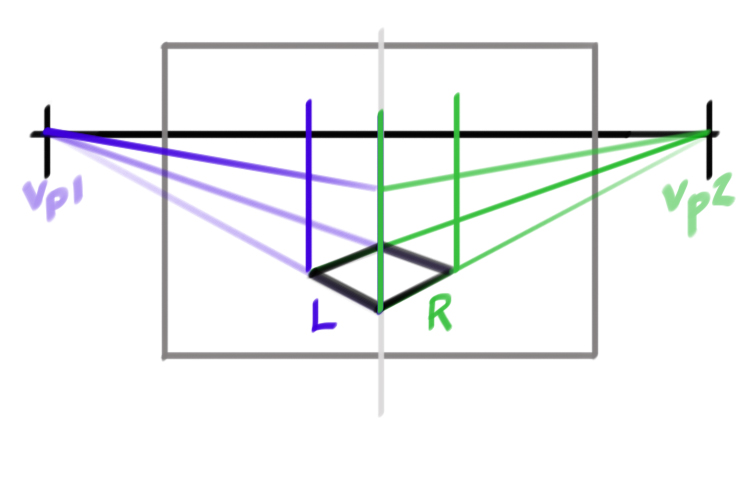
Now let’s build our next side wall: the right side.
First draw two vertical lines representing the squares centre edge and the left edge of our cube.
The centre edge is shared by both the right and left sides. So the height of our right side has already been determined by the height of our left side.
To find the top edge of this right side, draw a line from the right vanishing point (vp2) to the top of the centre edge.
Step 5: Top Side

This last stage mimics the process we used to build the base of our square. We already have the two front edges of our top side. Now we need to draw the two back edges.
Let’s start with the back left edge. Intuitively we might think we should start from the left vanishing point (left edge = left vanishing point). But look at your bottom base square. That back left edge is defined by a line coming from the right vanishing point.
If we think about it, the back left edge mirrors the front right line. So it makes sense that these two lines originate from the same vanishing point.
So to draw that back left edge of our top square we draw a line from the right vanishing point and pull it all the way to the top of the left vertical edge of our cube.
To find the back right edge we follow the same process. In this case we draw a line from the left vanishing point and pull it all the way to the top of the right vertical edge of our cube.
We have a lot of construction lines. To see our cube more clearly let’s draw over the main lines with a thicker black marker.