Light and shade is pretty exciting. We use light and shadow to communicate form, atmosphere and texture. For a lot of young artists it’s tempting to skip over some of the fundamentals and go right to light and shade.
What I hope to show with this week’s challenge is just how important those fundamentals are to our understanding of light and shade.
This week’s challenge
For this week’s challenge we are going to explore light and shade. To do this we are going to build on last week’s challenge. I recommend that you work through last week’s lesson before you start the one from this week.
For this week’s challenge you will need two colored pens and a slightly thicker marker. I would recommend a blue and a red ballpoint pen and a sharpie marker. If you also have a thin black felt pen that’s great (but not essential).
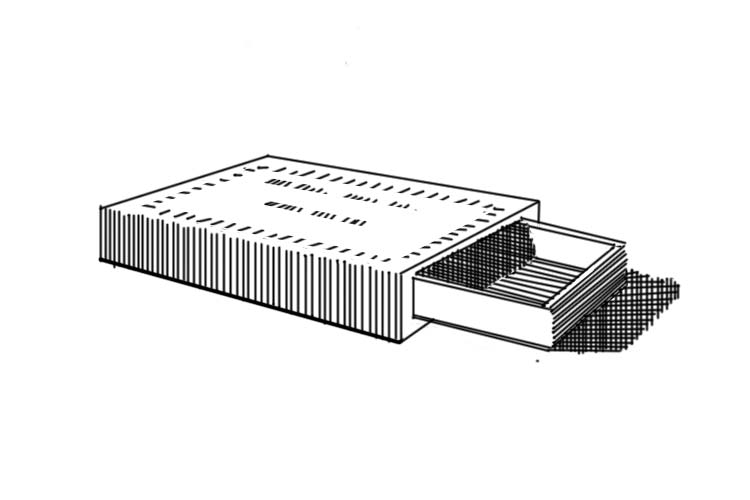
We are going to use a drawing by the artist and teacher Arthur L. Guptill. He wrote an excellent book called Rendering In Pen and Ink. I highly recommend his book to anyone looking to deepen their knowledge.
Start with a box
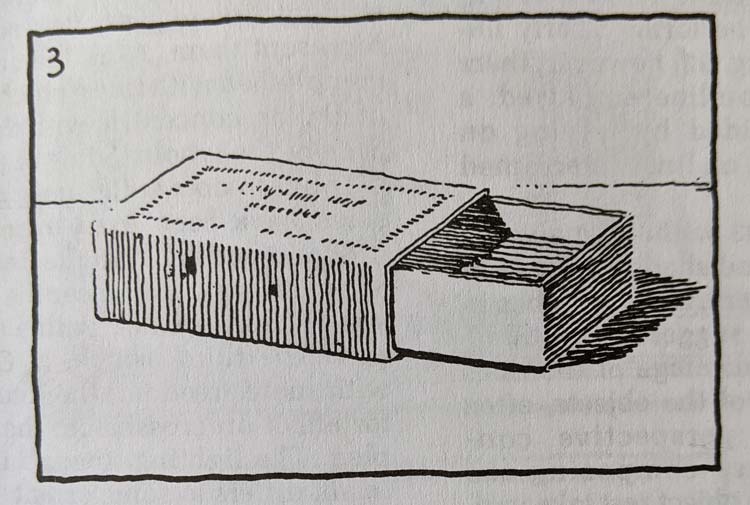
Before we even think about light and shade we need to understand the structure of our matchbox. If we had to describe our matchbox in simple geometric terms what would those be?
I see two thin boxes. The first box represents the main structure of our matchbox. The second box is slightly smaller. It comes out the right side of our main box.
Now that we have simplified our shapes we can start our drawing using our knowledge from the last challenge.
Draw the main box in perspective
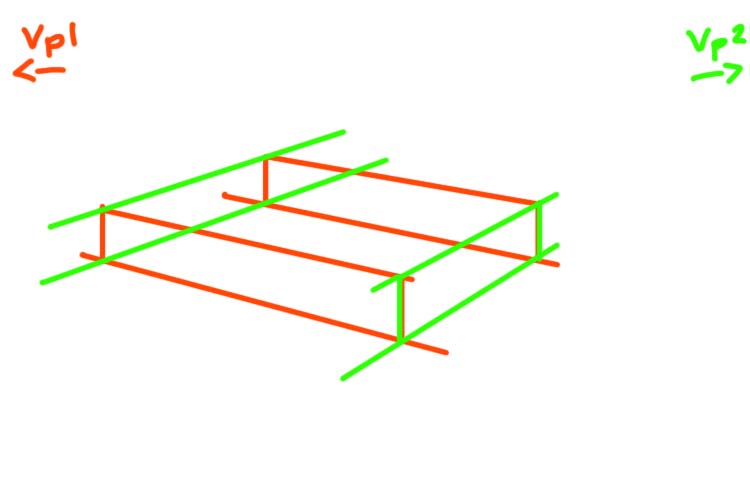
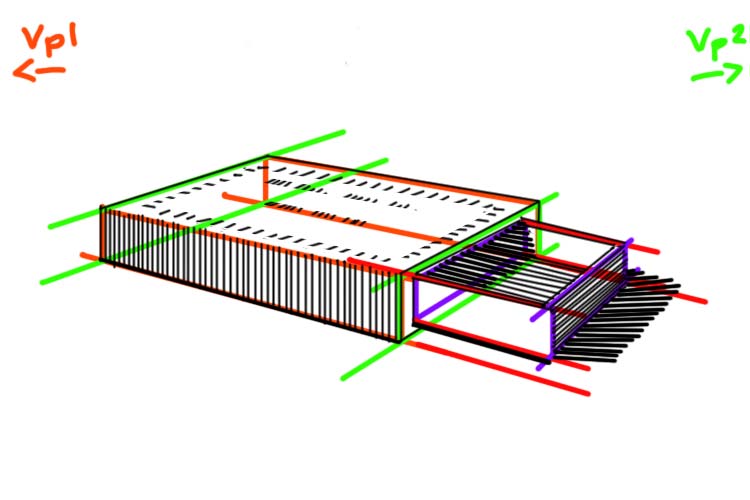
Our first step is drawing the main box in two point perspective.
In two point perspective the only parallel lines are the vertical height lines. The width and length lines of our box will recede towards two vanishing points (Vp1, Vp2).
Our first step is to draw a horizon line. When we look at the box we can see a lot of its top side. This tells us that the horizon line is significantly above our box. Let’s imagine a horizon line just beyond our picture plane.
To find our two vanishing points we are going to take the angle of the front two bottom edges of our box. Line a pencil up against the bottom right edge. Now imagine that your pen extended all the way until it met the horizon line. Where would that point be?
Do the same thing with the bottom left edge. In both cases that point where the line extending from the bottom line and the horizon line meet is outside our picture plane (the rectangle that defines our drawing). If it’s helpful draw a thumbnail version of your box with the horizon line and the vanishing points.
In our case it’s important to note that the vanishing point on the right is much closer to the picture plane than the left vanishing point.
Using your knowledge of perspective draw a box that represents the main section that makes our matchbox.
If you need a refresher on how to build your box check out our challenge rotating a cube.
Build a second box
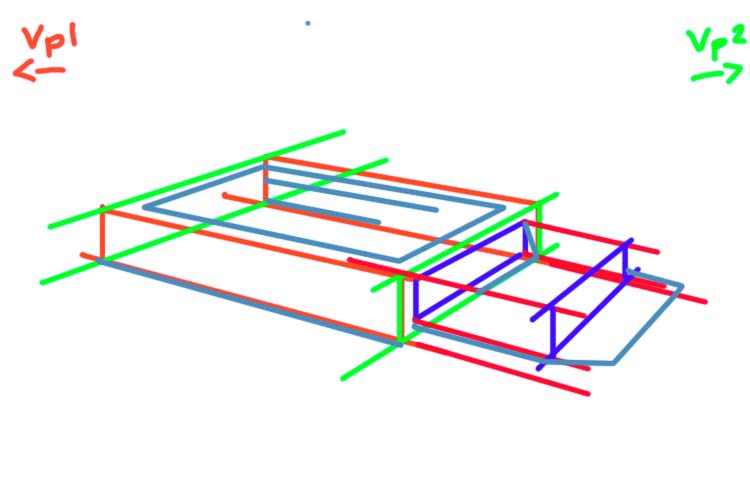
The matchbox provides a really excellent metaphor for how we can use perspective to build complex objects. Think about the mechanics of our matchbox. There is a main box and inside that box is a slightly smaller box that can be pulled out. In this drawing we see the second box pulled halfway out of the main box.
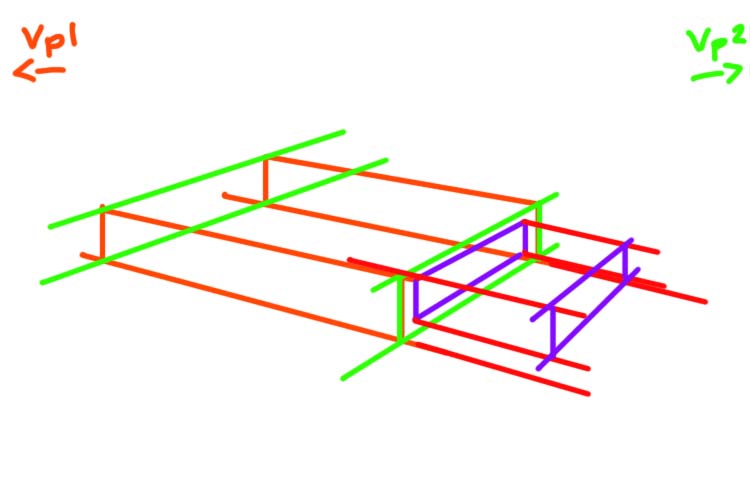
To start drawing this second box we need to think about its relationship to our main box. Using the right front side of our main box let’s define the main proportions of our second box.
On that front right side draw a slightly smaller rectangle (in perspective) that fits into this main box (purple lines). This new rectangle tells us the height and length of our smaller second box.
Using this information let’s draw the base of our new box. The length lines that define this second box must recede to the same vanishing points that defined our main box. Once you have your base, build out the rest of your smaller box.
Again for a more detailed description of this process, check out the step 2 of the “Add a Cylinder” section of the Building Blocks challenge.
An important stage
Before we move on, take a moment to consider how much time we spent on that first step of thinking through the structure of our drawing. This first stage is so essential to making a good drawing. Make you sure you give this first stage the time it deserves.
Light and shade
Now we can move on to the fun part: adding a sense of light and shade!
Value Scale
When we start a line drawing we always start by analyzing our shapes and proportions. In the same way, the first step in a light and shade drawing is to define and think about our shadow shapes.
First block out your shadow shapes. I see four shadow shapes
- The front left side of our matchbox
- The inside of smaller box
- The right front side of the smaller box
- The cast shadow of our match box on the right side
Now let’s rank the values of these four shadow shapes.

Let’s start with the darkest shape. The darkest shadow shape is the cast shadow. The artist has used thick lines that are very close together to define this shape. In a small box let’s mimic this same approach.
These same thick close lines are used in the left part of the shadow that makes up the inside smaller box.
If you only have one black pen. Another way to represent this darkest value is with cross hatching. Instead of using a thicker pen we will use two sets of lines (horizontal and vertical).
To the right of the tick lines inside the smaller box we see a value that is described by thin lines that are close together. We see this same pattern on the right front side of the smaller box.
Let’s expand our value scale by adding a second box. In the second box lay down a series of lines that mimic this approach.
Finally on the front left side of our main box we see a value that is represented by a series of vertical lines that are slightly more spaced apart.
Let’s expand our value scale by adding a third box. In the third box lay down a series of lines that mimic this approach.
Add a fourth and final box to your scale. Leave this one blank to represent the lightest value in our drawing : the whites.
Before you start any drawing with light and shade. It is useful to make this kind of value scale.
Adding value
Ok now we can start to ink our drawing. Let’s start by indicating our outlines. In some sections the artist has omitted the outline (look at the top edge of the front left side of our main box). This is an artistic choice – and should be noted). Try and be really exact and copy exactly the lines that the artist has used.
Once we have drawn the outline we can start adding the shade.
It’s useful to work from our darkest values to our lightest values. Let’s start with the front right side of the smaller box and the cast shadow. Make sure to note not only the value but the direction of the lines. The lines on the front right side of the box follow the perspective lines. The lines defining the cast shadow are right leaning diagonals.
Now add the value for the inside of the box. Again the lines follow the perspective lines that define the base of this box.
If you are using the cross hatching approach, add a series of vertical lines to the two darkest sections of the cast shadow and the inside of the box.
Next, let’s add a series of vertical lines on the front left side of the main box. Make sure that these lines have more space between themselves than the darker section.
Finally we can add the detail to the top side of the main box. Make sure these small dash lines follow the perspective lines of the main box. To help guide you, draw guidelines in perspective where you will be making the dashes.