Alright it is week two of the #InkCovid19 drawing challenge. Last week we started with a couple master copies. Our aim was to try and deconstruct these drawings. Our aim was to understand how an artist thinks about showing 3D space on a flat surface.
This week the training wheels come off. We are going live. I challenge you guys to work from life! I want you to set up your own still life and try drawing it.
Nothing is more challenging or rewarding than drawing from life. When we work from a photo or another artists drawing part of the job is already done. Those images have flattened space. When you work from life, you have to think about how you can use lines to recreate form and space.
Set up your still life
So to take on this drawing challenge you will need the following items:
- Toilet Paper Role
- Orange (or any round fruit)
- Salt shaker
- Thick book
- Large book (with limited images or text on cover)

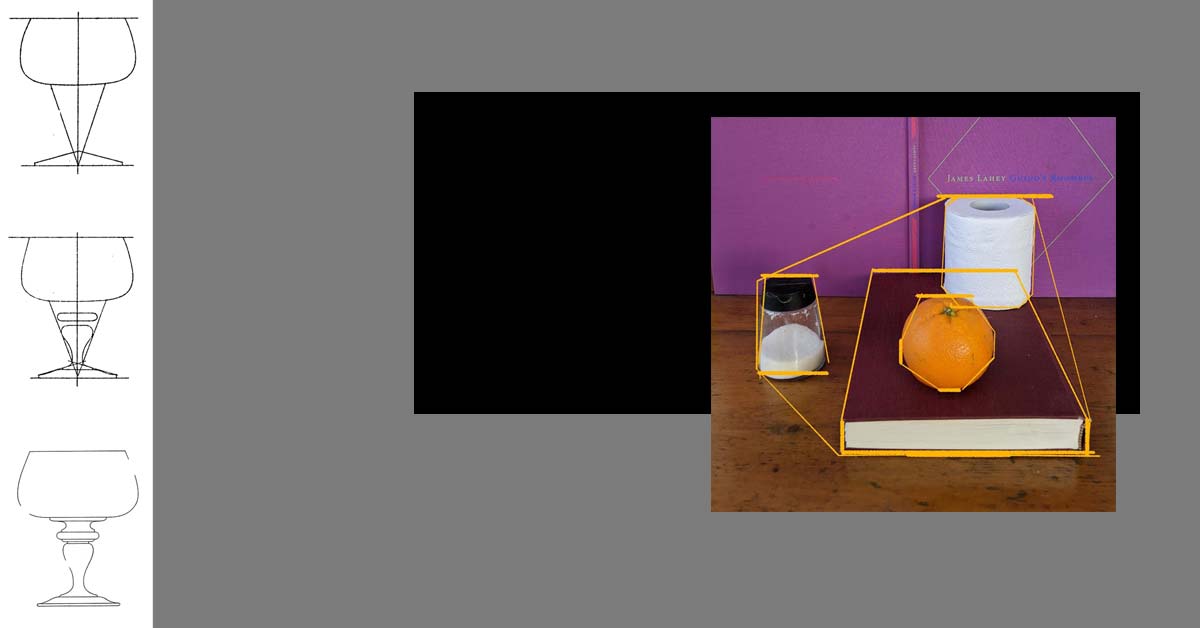
Set up these items using the above image as a reference. Spend some time trying to match the composition. Think about the relationship between the different items. Look at how the orange crops the bottom left corner of the toilet paper role. Look at the salt shaker. Most of it’s form is seen against the table top. Only the top part of the shaker is silhouetted against the purple background.
Getting your still life set up accurate is about practicing your observation skills. It’s about training your eyes to notice these kind of detailed relationships between the different objects we are drawing. All of this information will be used in the drawing process.
Block in: Big to small

Just like we did for our last drawing we are going to start with a very general black in. If you only had 4 or 5 lines how would you represent this group of objects. Think about the highest point (top of the toilet paper) and the lowest point (bottom of the book). Now mark the furthest point to the left (front edge of the book) and the furthest point to the left (left edge of the slat shaker).
Orange our unit of measurement

Once you have a large general shape we want to start blocking in the different objects. We want to be very careful and make sure we get the right size for each object.
How can we measure that distance? We need a unit of measurement. You can make anything your unit of measurement, for this example let’s use the orange. Stick your arm out nice and straight with a pencil in hand. With one eye closed the pencil can act like a ruler. Using the top of the pencil and your thumb measure the height of the orange. Loosely block in your orange on your page. With a straight arm measure your orange again and use that measurement to get the relative size and placement of the other objects.
If I measure the orange in my picture. I can see that that orange measurement will get me from the top of my orange to the top of my toilet paper. Keep taking measurements and making marks on your paper.
Horizon line and object tops

Now that we have the general shapes of our objects and their placement we want to add some detail. Our initial goal was to show 3D space on a flat piece of paper. The way that we can best express space is to show the volume or the form of each object. This means we want to express the different sides or planes of the objects.
For now we are going to keep things simple. Our goal is to express the top and the sides of of each object.
To do this we have to think about perspective and the horizon line. Again let’s keep things simple. The horizon line represents our eye level of the artist.
Generally speaking where is the horizon line in this drawing? Look at the top side of the toilet paper. Can you see the whole made by the cardboard cylinder? Or look at the orange. Can you see the flower stalk of the orange? Because we can see all of this information that makes up the tops of these objects we know that the horizon line or the eye level is above our still life.
If these objects were placed on a high shelf above our eye level we would not see the top side of our objects.
Back to our drawing, measure the height of the top side of each object compared to it’s vertical sides. A common mistakes when you first do this kind of exercise is to make that top end too small. So measure twice. To make your drawing even more 3D ad some simple shading to the vertical side of each object.
When we get more advanced we will use a lighting set up to make shadows on the objects as a way to indicated the different sides. For now I want us to think analytically. So we are using shade to indicate for our self the difference between the top and vertical sides of each object.
If you get this far, amazing! Move your object around and try a second set up.